
Getting Started
We have developed some tools to help you navigate your way around the night skies. As a beginner to stargazing, choose a clear night around the new moon (darkest time of the lunar cycle link to moon & sunset times). Enjoy exploring!
Stargazer’s Check List:
- Bring binoculars (never point binoculars or any lens directly at the Sun)
- Use only red torch light (your eyes need 20 minutes to adjust to darkness)
- Download the our seasonal Star Maps and Planisphere
- Check weather, cloud conditions and moon phase
- Wear warm clothes – hats, gloves, boots or sturdy shoes
- Stargazing is best on your back – bring a blanket
- Bring hot drinks and snacks
- Classic books add atmospheric nighttime reading. Try W.B Yeats’ ‘Fairy and Folk Tales of Ireland’
Please be mindful of our residents when parking or approaching sites at night
Astronomy Tips
Astronomy is a fun and rewarding pastime, and getting started is easy! Here are your 10 first steps to get you going:
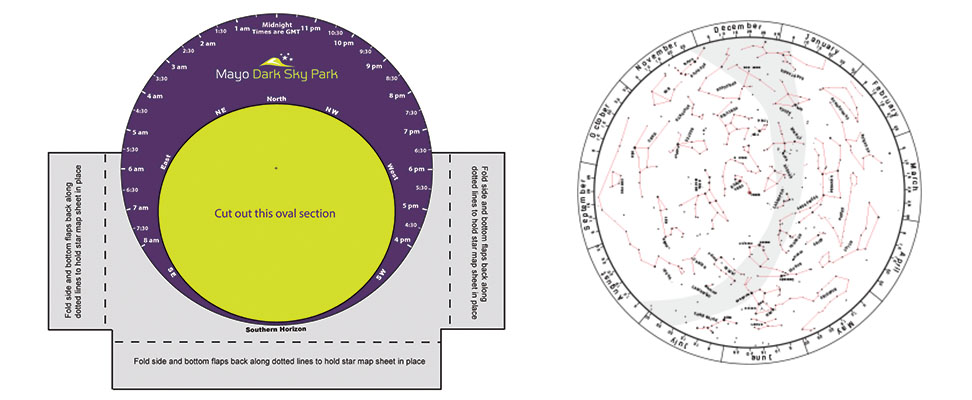
- Print a star chart for the current month or print out and assemble our downloadable Planisphere (star wheel), instructions are included in the download.
- Learn to navigate the night sky. At each time of the year, there are prominent, well-defined groups of stars (called constellations) that are easy to identify and are your starting point and sign-posts to the all of the others. For example, the Plough (The Big Dipper, Ursa Major) is visible all year round and is reasonably easy to spot. Keep in mind that you don’t have to learn all this by yourself – your local Astronomy club can help. Attend an observing session; there should be a laser-pointer guided tour of the sky.
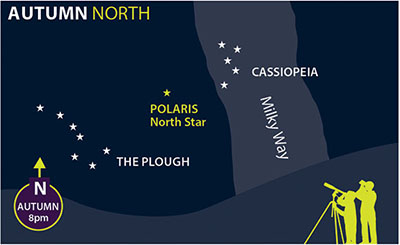
- Try a star hop. Once you have identified your first constellation, use it as a starting point to find the next. For example, when you have found the Plough, step from the pointers to the North Star (Polaris, in the Little Dipper) and then across the sky to Cassiopeia, which has a very distinctive ‘W’ shape.
- Get your binoculars out. Even the most basic ones will reveal a wealth of detail that you won’t see with the naked eye – double stars, star clusters, gas clouds and distant galaxies.
- Don’t rush out to buy a telescope. Yes, you will need one if your interest in Astronomy is more than a passing fancy – but you will need the one which is right for you. Again, your local Astronomy Club can help – by attending an observing session, you will get to look through a variety of instruments and learn first-hand the pros and cons of each. Keep in mind that portability is a huge issue – if you have to travel to your observing site (and most of us do), a large, unwieldy telescope that is difficult to set up will soon become a chore.
- Consider buying one monthly Astronomy magazine. The ‘Sky This Month’ section, in particular, will show you the highlights, the positions of the planets, any meteor showers and lots more besides.
- Buy one book – ‘Turn Left at Orion’ by Guy Consolmagno and Dan M. Davis. Written for beginners, this superb book is a complete guide to the night sky – but check it out online before you buy.

- Download and install Stellarium, a planetarium software that shows exactly what you see when you look up at the stars. It’s easy to use, and free for PC and MAC.
- Dress for it! There is nothing quite like frozen feet to take the gloss off an observing session and send even the most hardened observer scurrying back indoors – there is a fair amout of standing around involved and even summer nights can be cold. Depending on the location of the observing site, you may also need to consider insect repellant.
- Get out there and enjoy – the wonders of the night sky will provide you with a lifetime of enjoyment, particularly here in Mayo where we are blessed with such pristine dark skies.